
Processing learning content
To help you study in the right way, we created these five steps: exploring, structuring, schematising, memorising, and repeating. Run through these, be inspired, and try some tips. You will find that you become more efficient and start the assessment period well prepared.

Step 1: exploring
In this initial stage, you will explore your educational materials. This means that you check what your course materials consist of, what content it contains, and what size it has. In this way, you form a mental image of what you must do and you prepare the brain for the study stage.
Fase 1: collect your study materials
A course consists of more than a coursebook alone. Sometimes slides are shown in class, the lecturer refers to learning paths on Canvas, you get additional exercises or reading, or you have many notes which you made in class. All these materials are part of your study materials.
- Check what your study materials consist of exactly and collect everything.
- Is anything missing? Then search for what you need, or ask a fellow student for advice. In this way, you do not have to lose time on this during the exam preparations.
- Order your materials logically. For instance, put your notes in the order of the lessons, and search for the slides, exercises, and articles. Like this, you will know where everything goes.
Fase 2: explore your syllabus
Now open your syllabus or coursebook, and check the table of contents in detail, headings and subheadings. This stage is crucial to be able to situate everything you read in the syllabus. The headings tell you what the course is about and the whole of these titles form the framework of your course.
If you gradually memorise this framework or table of contents, at the test or the exam you will better understand what the question is about. You immediately know in which chapter you can find the answer to your question.
Fase 3: turn your table of contents into a convenient framework
There are several ways to edit the table of contents. These tips will get you started:
- Go to the table of contents and read it carefully.
- Ask yourself questions. In this way, you can check whether you understand everything.
- Add structure to your table of contents
- Add numbering if this is missing.
- Highlight or underline the keywords, to make the essence visible.
- For highlighting, use one colour per level. Do not highlight the last level.
- Your table of contents counts 1, maximum of 2 pages.
- Too long? Leave out unimportant (sub)headings that say nothing about the learning content, like 'exercises', 'literature', 'annexes', 'examples', etc. Keep to keywords and do not include articles and repeated words. Only keep the most important (sub)headings.
- Too short? Expand your table of contents by headings and subheadings in your syllabus. Again, use the keywords.
Getting started
Do you want to practice editing the table of contents? You can do it in this exercise. Use the correction key to compare your result.
You can also practice with a table of contents from your own courses. Try to add structure through highlighting, and next take a look at our checklist.
Step 2: structuring
In the previous, exploratory stage, you studied your table of contents in detail, and you collected the materials you need to study this course. Now we can have a closer look at the learning contents.
In this learning contents, we will first add some structure. As such:
- we indicate what the broad lines are in the learning content,
- we check if we understand these, and
- we create a feasible schedule.
By focussing on the 'essentials' and structuring those, you will remember a large part of the learning contents.
Jump to: tips - additional tips - start
Tips
Fase 1: mark structure - Start with the headings and subheadings and mark the essence.
This helps you gain an insight into the structure of your text.
- Work in the same way as for the table of contents: only highlight the most important words from the (sub)headings.
- Use one colour per level.
- Maintain this structure in all your courses. This helps your brain instantly recognise the various levels.
Fase 2: understand - Read the text a first time thoroughly, one paragraph at the time.
- Understand what you read! Use your prior knowledge and ask yourself out loud if you already know anything on this subject. If you can link new information to information from your long-term memory, then you will instantaneously process the learning content actively and you will remember it better.
- Difficult words can be found in a dictionary, via a specialised website, or maybe a glossary at the back of your syllabus.
- Recognise the various kinds of signal words . These help you interpret a text correctly and find the structure of the text.
Fase 3: test - Ask yourself the question 'What am I reading?'
- For every subheading, ask yourself a W-question :
Who? What? Where? Why? When? Which? - If the text is long and/or treats various aspects, then add a subheading in the margin.
Fase 4: highlight content - Read the text a second time and highlight the keywords.
- Please note! Do not highlight any full sentences, only the most important words.
- The most important words are often:
- the answers to your W-questions,
- words that are already marked in the syllabus, in bold, italic, or underlined,
- words explaining an image,
- words from your notes or slides.
Fase 5: schematise - Create a structured scheme of the selected headings & text.
- Keep asking yourself questions.
- Do I understand the subject matter?
- What exactly is this about?
- What connections can I find?
- Do I know an example of my own?
- What questions can I get about this? ...
- Test yourself and stay active.
Additional tips
- Keep asking yourself questions.
- Do I understand the learning contents? What exactly is this about?
- What connections can I find?
- What questions can I get on this?
- Establish the link between practice and reality. Search for your own examples.
- Discuss the content with yourself and your fellow students.
- Do you take a subject with mainly digital study materials? Check if a structure is available there too. If not, then create one on paper.
- Apart from your digital study materials, do you also have a paper syllabus? Then place the used structures side by side. Are they the same? What are the differences? Now try to arrive at one structure on paper that you can use further. If the differences between both are too substantial, then compare them and check where they overlap.
Getting started
This stage of structuring and distinguishing essential and additional information requires some practice. You can soon find practice material with correction keys below.
Do you prefer practising with your own course materials? You can find some checklists here soon.
Step 3: schematising
You have explored and structured the learning contents. Now we will take a more detailed look at the content.
An important tool to do this are schemes. Through schemes, you can break free from the existing text or syllabus, and you can even create something new, and it is just that which helps your brain. After all, you must learn to make connections between the content, create a visual image of these connections, and add keywords or sentences.
The result? You are dealing with your learning contents in a very active manner, and this will enable you to memorise it faster later!
For certain students, this is a difficult stage, but if you went through the earlier stages well, the biggest work is already done.
Jump to: tips - how about a digital module? - scheme for everything - start
Tips
Fase 1: choose what kind of scheme you want to create
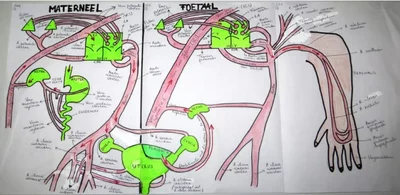
You have different kinds of schemes. You already know the table of contents and you also created a mind map or summary before. Additionally, you can choose for a timeline, a table, a tree structure, or a cyclical scheme, depending on the content you would like to schematise.
Example of a cyclical scheme
Fase 2: add all headings and subheadings in your scheme
Example of a tree structure with (sub)headings
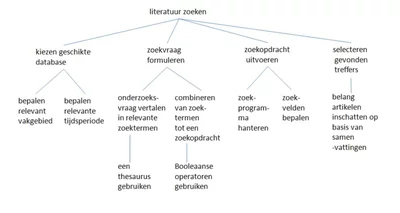
Fase 3: describe the essentials of your text as briefly as possible
- Do not use full sentences, only keywords
- Especially, write down the steps of your thought process (What? Which? ...)
- Use symbols, arrows and abbreviations to connect
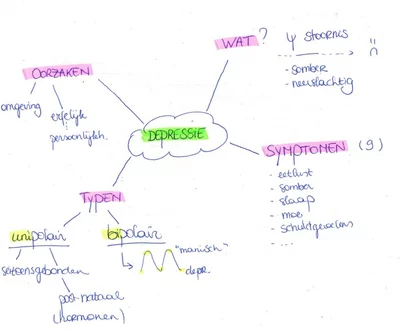
If you want to indicate there are five symptoms of seasonal depression, then write down 'Symptoms (5)' instead of writing these symptoms in full. If you keep on writing down all the details in your scheme, then you will not achieve recognition (= no knowledge!).
If you would like to indicate there are five symptoms of seasonal depression, then write down 'Symptoms (5)' instead of writing these symptoms in full. If you keep on writing down all the details in your scheme, then you will not achieve recognition (= no knowledge!).
Example of a mindmap
How about a digital module?
If you want to indicate there are five symptoms of seasonal depression, then write down 'Symptoms (5)' instead of writing these symptoms in full. If you keep on writing down all details in your scheme, then you will not achieve recognition (= no knowledge!).
Do I have to create a scheme of all learning contents?
No, sometimes learning contents are relatively simple, and then it is not necessary to create a scheme.
Often it is not necessary to know all learning contents in equal detail. Certain sections are mere illustrations or articles which you must read the broad lines of.
So choose more complex content which you want to feed your brain in a simple manner.
Getting started
Do you want to set to work with a mind map? Then download the practice text here (soon), create a mind map, and at the end use this example (soon) to check it. Forgotten something?
Do you want to set to work with other schemes? Below you will soon find two texts. Try to create an appropriate scheme for every text. The correction key will provide inspiration.
Do you want to work with your own course material? Use the schematising checklist.
Step 4: memorising
This stage is the jewel in the crown of all the work you did so far. Make sure you take enough time for this so that your preparation was not in vain.
By memorising, you systematically learn certain content by hard. We use the word 'memorising' as it concerns remembering a structure you found yourself and which gave you an insight into the course. Memorising is also necessary for insight questions or multiple choice exams.
Tip 1: getting started
- Do not postpone studying. That only increases the work pressure.
- Do not keep the harder chapters for later. It is easiest to memorise those with a clear head.
- Start from the table of contents – your framework, remember? – and attach new details to this.
- Exchange your screen for paper. Research has shown that you remember fewer details when studying from a screen compared to paper.
Tip 2: study actively
- Do not lapse into passive reading and rereading of your syllabus, but set to work. Write down keywords, draw up schedules, or write down bulleted lists which you must memorise for a test ... This can be just a draft as it is only meant for you.
- Explain what you learned out loud, to a friend, your grandma, or just in front of a mirror. Here applies too: the more active, the better!
- Ask yourself questions like ‘What exactly is being said here?’, or ‘How could I explain this chapter briefly to someone who has no knowledge on this subject?'. This is a very simple way to check if you understood everything well. Check your answers afterwards.
Tip 3: help your brain
- Come up with memory aids for the learning contents you cannot remember. For instance, make words or sentences with the first letters of the items you want to remember. Careful, memory aids work best for relatively small amounts of information.
- Images might help too. For instance imagine a person who shows the characteristics you have to remember, or think of situations that are a perfect illustration of what you must learn.
Examples:
- To remember the cardinal directions: Never Eat Soggy Waffles > North – East – South – West
- To distinguish good from bad cholesterol: HDL > H stands for healthy, LDL > L stands for lousy
- To remember the four production factors: CELL > Capital – Entrepreneurship – Labour – Land
- To remember the taxonomy of plants and animals: Dear King Philip Came Over For Good Soup > Domain, Kingdom, Phylum, Class, Order, Family, Genus, Species
Tip: Use an existing word. Those are easier to remember than non-existing words. Why? This word makes it easy to form an image, and images are stored in your memory much easier.
Tip 4: test yourself
- Test yourself by means of short test questions. In this way, you can see what you already know and what you must pay more attention to.
- Use your table of contents or a schedule to explain what you remembered.
- Come up with your own question on a chapter or paragraph, you can use this question later when you are repeating
- A useful computer program to test yourself is Anki. You enter questions and answers and you learn through spread repetition.
Tip 5: vary between effort and relaxation
- Study in short time blocks, for instance 50' - 10' break - 50' - 10' break - 50' - 60' break.
- Take a longer break after three hours.
- Have moments of relaxation when you let your brain rest completely. Active breaks give you new energy: run on the stairs and get a glass of water, or take a walk around the block. Outdoor air and exercising will charge your batteries faster!
Tip 6: avoid distraction during your study blocks
- Disable all notifications on your devices and put your smartphone on the side.
- The app Forest may help, apart from temporary website blockers like ‘Cold Turkey’, ‘FocalFilter’, or ‘KeepMeOut’.
- Put a note on your door that you do not want to be disturbed and inform your housemates in advance.
Tip 7: reflect
- Now and then, take a moment to reflect on your study behaviour. Is everything going as expected? What went smoothly? What could go better?
- If certain things could go better, then choose one aspect you want to pay special attention to during your next study session.
Step 5: repeating
Do you want to remember new knowledge and apply it to the exam or in actual practical situations? Then you must repeat this knowledge, preferably three times.
Ga snel naar: tips - importance of good planning - practicing
Tip 1: repeat and test yourself until you really master it
- For instance, open your syllabus at a random page, read the title and try to tell what you know about this section.
- Or take your schedule, table of contents, or framework with you, and take a walk around the neighbourhood. These should be sufficient to be able to tell all you know.
Tip 2: ideally study three times
- First time - Immediately after the chapter has been completed in class: read, process, and schematise.
- Second time - During the pre-exam study period: schematise and memorise.
- Third time - A few days before the exam: memorise again, and repeat.
Tip 3: test yourself
- Do not fool yourself. Understanding something does not mean that you can formulate an answer yourself. So ask yourself questions and check if you can answer them.
- Check your answers for accuracy and completeness. Do not throw your syllabus aside, but use it to check if you memorised everything correctly.
Het belang van een goede planning
Many students postpone memory work (memorising) until right before the exam with the idea ‘What I learn now, I will have forgotten within 4 weeks!’. However, the memorising stage (step 4) is already in progress when you are structuring (step 2) and schematising (step 3)!
Even if you are not consciously memorising at that moment, by dealing with your learning contents in such an active manner, you automatically learn certain contents. When you are looking for an insight and structure, nerve paths are being created in your brain, which you can recall later.
When consciously memorising (step 4), you will reinforce these paths, allowing you to recall knowledge gained before from your memory fast, e.g. on an exam.
Please note! Don’t do all memory work at once, but divide it over several short periods! Good planning skills are vital!
Getting started
Did you run through all the steps and think you have mastered everything? You can soon find a synthesis exercise and the correction key here.
Did you study everything well? You can soon find a mini exam here as well.